이번 강의에서 진행할 내용은 크게 아래와 같다.
1. 클라이언트로부터 POST로 요청받은 데이터를 parsing 하기 위한 body-parser 설치
2. /campground에 새로운 name와 imageUrl을 추가하기 위한 페이지 생성
3. 전달받은 name과 imageUrl를 newCampground object로 저장한 후 campground 배열에 저장(push)
4. /campground에 전달받은 name과 imageUrl을 출력
1. body-parser 설치 및 호출
1-1. body-parser란? POST method로 파라미터가 서버로 전송되었을 경우, 해당 파라미터를 추출하기 위한 패키지

1-2. app.js에서 bodyParser 호출
const bodyParser = require("body-parser");
app.use(bodyParser.urlencoded({extended: true}));
body-parser에 대한 설명은 github 링크 참조
1-3. 새로운 route 추가 및 post 동작 테스트
app.post("/campgrounds", (req, res) => {    //express 서버에서 '/campgrounds'에 'POST'가 요청될 경우
	res.send("YOU HIT THE POST ROUTE");		// "YOU HIT.." 라는 데이터를 클라이언트로 response한다.
});

app.get("/campgrounds/new" (req, res) => { //	'/campegrounds/new'로 GET이 요청될 경우
	res.render("new")					   //   YelpCamp/v1/view 아래에서 new라는 이름의 파일을 찾아 렌더링하여 응답한다.
});


2. 데이터를 전달받을 ejs 생성
<%- include("partials/header")%>		<!--lesson 296 참조-->

<h1>Create a New Campground</h1>
  <form action="/campgrounds" method="POST">			<!--아래의 input 값을 POST method로 /campgrounds에게 request-->
    <input type="text" name="name" placeholder="Insert name">		<!--입력될 데이터는 name이란 이름 속성을 가지고 있음-->
    <input type="text" name="image" placeholder="Insert imageUrl">  <!--입력될 데이터는 image이란 이름 속성을 가지고 있음-->
    <button>Submit!</button>							<!--해당 버튼을 누르면 데이터가 전송됨-->
  </form>
<a href="/campgrounds">Go back</a>
<%- include("partials/footer"%>		<!--lesson 296 참조-->
3. POST로 전달된 파라미터를 저장하여 /campgrounds에서 출력
3-1. /campgrounds/new로 받을 데이터를 저장하기 위한 array 설정
기존에 사용하고 있는 지역변수인 campgrounds를 전역변수로 재설정하여 /campgrounds/new 에서 해당 array에 접근할 수 있도록 한다. 만약 campgrounds array가 지역변수로 되어 있을 경우 다른 메소드에서 해당 값에 접근이 불가능하다.

3-2. /campgrounds로 들어온 POST 요청에 들어있는 name과 image 저장
app.post("/campgrounds/new", (req, res) => {  // /campgrounds/new라는 주소를 post로 요청받으면 아래 로직 수행
	const name = req.body.name		// 서버로 요청된 body태그 내의 name이란 name을 가진 데이터를 const name에 저장
    const image = req.body.image 	// 서버로 요청된 body태그 내의 image란 name을 가진 데이터를 const image에 저장
    const newCampground = {name: name, image: image} // 위의 전달 받은 데이터를 newCampground object에 저장
    campgrounds.push(newCampground) // 전역변수 campground array에 newCampground object를 push(입력) 한다.
    res.redirect("/campgrounds")    // 마지막으로 응답 시 /campgrounds로 페이지를 리다이렉트 시킨다.
});
최종적으로 저장된 값은 그림 5의 const campgrounds에 저장된다.
3-3. campgrounds.ejs에 새로운 name과 image를 추가할 수 있는 페이지로 이동하는 링크 추가
<%- include("partials/header%>
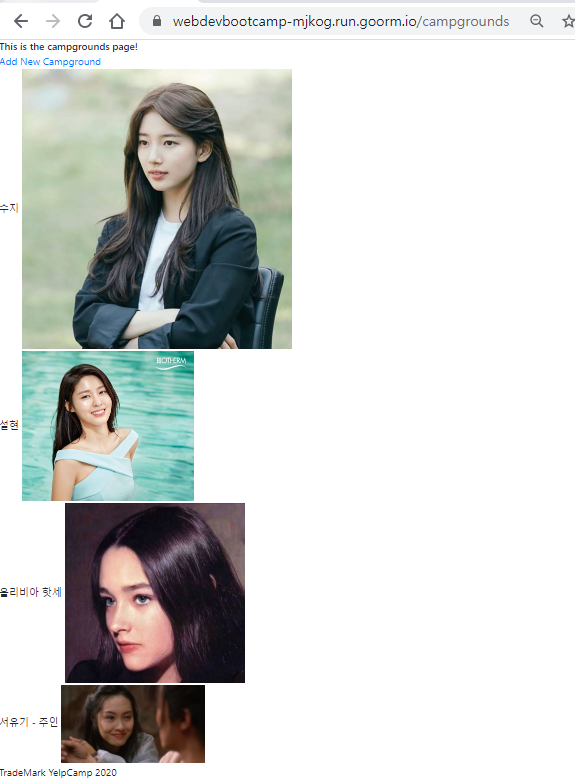
<h1> This is the campgrounds page! </h1>
<a href="/campgrounds/new">Add New Campground</a> <!--/campgrounds/new로 이동하는 링크 추가-->
<% campgrounds.forEach((campground) => {%>
<div>
<h4>
<%= campground.name %>
<img src="<%= campground.image %>">
</h4>
</div>
<%});%>
<%- include("partials/footer") %>
4. 실제 서버 동작여부 테스트
4-1. /campgrounds로 접속
4-2. /campgrounds/new 페이지에서 실제 데이터 입력 및 submit 버튼 클릭


'Full stack development > The Web Developer Bootcamp(2020)' 카테고리의 다른 글
| 303. Mongo Shell Bacis (0) | 2020.09.27 |
|---|---|
| 300. YelpCamp: Styling Nav and Forms (0) | 2020.09.26 |
| 299. YelpCamp: Styling Campgrounds (0) | 2020.09.26 |
| 298. Note about YelpCamp: Styling Campgrounds Lecture (0) | 2020.09.26 |
| 296. YelpCamp: Layout(header&footer 생성 및 적용) (0) | 2020.09.26 |