In the next lecture Colt introduces a new format for sending data to the server from a form. Up to this point you have used the name attribute like so:
<'input type="text" name="title"> Now Colt will write it like this: <'input type="text" name="blog[title]">
What this will do is, instead of making the value for title available directly from req.body.title it will put it inside of an object, like so: req.body.blog.title
Now all of the values from the inputs in the form get added into one object (req.body.blog) and you can easily input that data into the database simply by passing in req.body.blog to Blog.create()
Once in the POST route, the req.body.blog object will look something like this: { title: "Hello world", description: "This is a blog post" } I've commented on this further here, including the reason why we use the name="blog[title]" syntax instead of name="blog['title']" or name="blog.title" TL;DR: this syntax is specific to body-parser.
Please let me know if you have any questions by replying to the thread linked above. cheers, Ian
Hi Everyone! Please review the following notes so that you may continue the course without issue:
If you're having trouble with the EJS include syntax in the next lecture then please review the note from section 28 regarding the syntax change in version 3.0.1, you can find it here.
Meanwhile, in the next lecture Colt mentions a spacing problem with the navbar, but he doesn't resolve that issue in the same video.
This has caused some confusion among students, so I just wanted to let you know that he will resolve the overlapping navbar issue in the Blog App: NEW and CREATE video.
There's nothing you need to do, just be aware that the navbar issue isn't resolved right away and that he will correct it shortly thereafter in a later video.
Lesson 312에서는 RESTful Route의 7가지 기능 중 INDEX에 대해 알아본다.
Name
Path
HTML Verb
Purpose
INDEX
/blogs
GET
List all blogs
New
/blogs/new
GET
Show new blog form
Create
/blogs
POST
Create a new blog, then redirect somewhere
Show
/blogs/:id
GET
Show info about one specific blog
Edit
/blogs/:id/edit
GET
Show edit form for one blog
Update
/blogs/:id
PUT
Update a particular blog, then redirect somewhere
Destroy
/blogs/:id
DELETE
Delete a particularblog, then redirect somewhere
INDEX는 서버에 특정 URL로 GET method request가 전달될 경우 모든 페이지를 보여주기 위한 목적으로 사용한다. 즉 특정 URL로 GET 요청이 들어올 경우 index 페이지로 이동한 후 DB에 저장된 모든 데이터를 보여준다.
1. 개발환경 설정
1) framework 설치
#npm init : npm init(package.json 파일 생성 및 의존성 등의 정보를 기록하기 위해 생성
#npm install express mongoose body-parser --save : 해당 프로젝트에 사용할 node express, mongoose, body-parser 들을 npm(Node Package Management)를 이용하여 설치하고, 의존성을 package.json에 자동 저장
mongoose.connect("mongodb://localhost:27017/restful_blog_app", {useNewUrlParser: true, useUnifiedTopology: true}); //db가 없을 시 생성하므로, 동일한 db와 연결하는 한 이름은 중요하지 않다.
app.get("view engine", "ejs"); // ejs 파일 확장자 없이 명시없이 사용
app.use(express.static("public")); // custom stylesheet를 사용하기 위한 경로("public")
app.use(bodyParser.urlencoded({extended: true}));
app.listen(process.env.PORT || 3000, (){
console.log("REST Server is running");
};
3) Mongoose Schema 생성
const blogSchema = new mongoose.Schema({ // mongoose의 Schema 메소드를 상속받은 blogSchema 생성
	title: String,
	image: String,
	body: String,
	created: {type: Date, default: Date.now} // 현재 시간을 출력
});
4) Schema 할당
: 3)에서 생성한 Schema가 mongoose method를 가질 수 있도록 상속시킨다. (mongoose가 가진 속성/기능을 사용하기 위함)
const Blog = mongoose.model("Blog", blogSchema);
3. RESTful ROUTES
1) INDEX 생성
브라우저에서 "/blog"로 GET method 요청이 들어왔을 때 미리 만들어놓은 "index.ejs"를 렌더링하여 응답하고, DB에 저장된 데이터를 blogs라는 이름으로 "/index"로 전달한다.
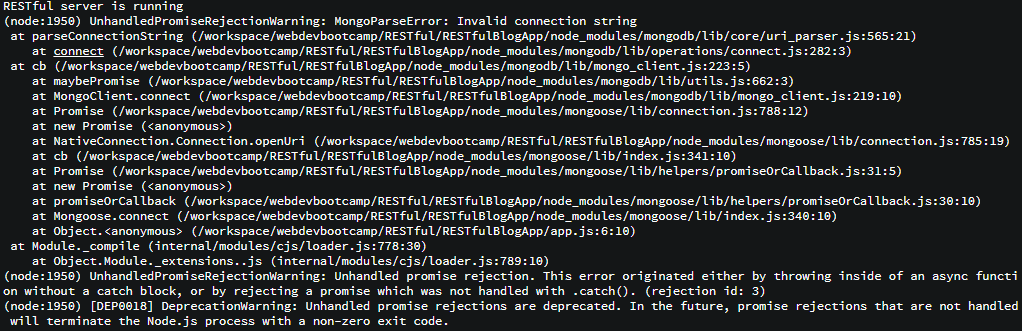
(node:1950) UnhandledPromiseRejectionWarning: MongoParseError: Invalid connection string at parseConnectionString (/workspace/webdevbootcamp/RESTful/RESTfulBlogApp/node_modules/mongodb/lib/core/uri_parser.js:565:21) at connect (/workspace/webdevbootcamp/RESTful/RESTfulBlogApp/node_modules/mongodb/lib/operations/connect.js:282:3) at cb (/workspace/webdevbootcamp/RESTful/RESTfulBlogApp/node_modules/mongodb/lib/mongo_client.js:223:5) at maybePromise (/workspace/webdevbootcamp/RESTful/RESTfulBlogApp/node_modules/mongodb/lib/utils.js:662:3) at MongoClient.connect (/workspace/webdevbootcamp/RESTful/RESTfulBlogApp/node_modules/mongodb/lib/mongo_client.js:219:10) at Promise (/workspace/webdevbootcamp/RESTful/RESTfulBlogApp/node_modules/mongoose/lib/connection.js:788:12) at new Promise () at NativeConnection.Connection.openUri (/workspace/webdevbootcamp/RESTful/RESTfulBlogApp/node_modules/mongoose/lib/connection.js:785:1 9) at cb (/workspace/webdevbootcamp/RESTful/RESTfulBlogApp/node_modules/mongoose/lib/index.js:341:10) at Promise (/workspace/webdevbootcamp/RESTful/RESTfulBlogApp/node_modules/mongoose/lib/helpers/promiseOrCallback.js:31:5) at new Promise () at promiseOrCallback (/workspace/webdevbootcamp/RESTful/RESTfulBlogApp/node_modules/mongoose/lib/helpers/promiseOrCallback.js:30:10) at Mongoose.connect (/workspace/webdevbootcamp/RESTful/RESTfulBlogApp/node_modules/mongoose/lib/index.js:340:10) at Object. (/workspace/webdevbootcamp/RESTful/RESTfulBlogApp/app.js:6:10) at Module._compile (internal/modules/cjs/loader.js:778:30) at Object.Module._extensions..js (internal/modules/cjs/loader.js:789:10) (node:1950) UnhandledPromiseRejectionWarning: Unhandled promise rejection. This error originated either by throwing inside of an async fun ction without a catch block, or by rejecting a promise which was not handled with .catch(). (rejection id: 3) (node:1950) [DEP0018] DeprecationWarning: Unhandled promise rejections are deprecated. In the future, promise rejections that are not hand led will terminate the Node.js process with a non-zero exit code.
해당 에러 발생 시 mongodb://..... 부분에 오류가 없는지 확인한다.
mongoose.connect("mongodb://localhost:27017/restful_blog_app", {useNewUrlParser: true, useUnifiedTopology: true});
// mongoose 이나 어떤 방식으로든지 mongodb와 연결 할 시 오타가 있을 경우 연결이 안됨을 알리는 에러이다.
// mongdb, mondb, mongod 등 오탈자가 있는지 확인한다.
: HTTP route와 CRUD를 매핑하는 역할을 한다. 즉 특정 URL과 HTTP method를 통해 서버로 Request가 들어오면 이를 해석하여 DB에 내용을 추가, 조회, 업데이트, 삭제하기 위함이다. 크게 4가지(CRUD)가 있으나, 편의를 위해 7가지의 카테고리가 구분하여 사용한다.
3. Sample of the RESTful API/Routing
하나의 blog/게시판/웹사이트를 만들었다고 가정할 때, 가장 기본적인 기능은 1) 게시물 생성 2) 게시물 조회 3) 게시물 수정 4) 게시물 삭제이다. 이 4가지 기능을 상세화 시킨 내용을 정리해보면 아래의 표와 같다.
Name
Path
HTML Verb
Purpose
INDEX
/blogs
GET
List all blogs
New
/blogs/new
GET
Show new blog form
Create
/blogs
POST
Create a new blog, then redirect somewhere
Show
/blogs/:id
GET
Show info about one specific blog
Edit
/blogs/:id/edit
GET
Show edit form for one blog
Update
/blogs/:id
PUT
Update a particular blog, then redirect somewhere
Destroy
/blogs/:id
DELETE
Delete a particular blog, then redirect somewhere
1) INDEX(/blogs) : /blog 에 접속했을 경우 블로그에 있는 모든 게시글을 화면에 보여주는 목적으로 사용
2) New(/blogs/new) : /blog/new 에 접속했을 경우 블로그에 게시글을 생성할 수 있는 form을 보여준다. <form action="/blogs", method="POST">내부 input 태그에 작성한 내용을 3)으로 전달하는 역할까지만 수행한다. (게시물의 제목, text, 이미지 url 등) 3) Create(/blogs): 3) /blog/new 에서 <form> 태그로 전달한 데이터를 POST 형식으로 전달받는 목적지이다. 게시물을 DB에 저장하고 특정 페이지로 이동시키는 목적으로 사용한다. "게시물이 정상적으로 등록되었습니다" 라는 페이지나 블로그 index 페이지로 이동하게 될 것이다.
4) Show(/blogs/:id) : 특정 페이지에 대한 상세내용을 보여줄 때 사용한다. 일반적으로 게시판에 게시물 제목, 작성자, 날짜 등만 보여준다면 DB에 저장된 id값을 조회하여 본문 내용을 보여준다.
5) Edit(/blogs/:id/edit) : id로 조회된 특정 페이지를 update 시키기 위한 form을 보여준다. 6) Update(/blogs/:id) : .3)과 비슷한 개념이지만 3번의 경우 id를 새로 생성하고, 목적에 따라 저장되는 위치(블로그일 경우 카테고리 등)가 달라지거나 입력을 해야하지만 Edit의 경우에는 해당 위치에 생성된 데이터를 단순히 수정하므로, 저장 위치와 id는 동일하다. url형태는 4)Show와 동일하지만 HTML method가 다르므로 전혀 다른 기능을 수행한다.
7) Destroy(/blogs/:id) : 특정한 게시물을 삭제한다. 특정한 하기 위해 id값을 사용하며, 최소한 동일한 collection에서는 유일함을 보장한다.
상기 표에 있는 7가지 기능은 결국 CRUD(Create, Read, Update, Destroy)의 돕거나(게시글 작성 페이지, 게시글 수정 페이지) 조회하는 목적을 위해 사용하므로 CRUD의 개념만 정확히 이해하면 된다.
309에서 각 RESTFUL Route 시 사용한 페이지별 ejs 파일을 다시 한번 정리한다.
309의 app.js에 작성된 RESTFUL Route에서 사용되는 페이지의 정보는 각각 아래와 같다.
name
url
verb
description
INDEX
/campgrounds
GET
Display a list of all dog
NEW
/campgrounds/new
POST
Display form to make a new dog
CREATE
/campgrounds
POST
Add new dog to DB
SHOW
/campgrounds/:id
GET
Show info about one dog
render에 사용되는 각각의 페이지는 DRY(Don't Repeate Yourself)를 적용하기 위해 [그림 1]과 같이 공통되는 부분을 header와 footer를 붙여 사용한다. 페이지가 복잡하여 메뉴가 많아지거나 디자인 할 요소가 많아질 경우 소스를 일일이 복사하여 사용하는 것보다 header와 foot에 디자인을 적용시킨 후 해당 파일만 불러와 사용할 경우 유지보수나 스크립트 작성 시 많은 시간을 절약할 수 있다.
[그림 1] header 와 footer 적용
[그림 2] 모든 페이지에서 적용된 header와 footer
[그림 3] 실제로 사용한 header의 내용, title, bootstrap호출, 상단 메뉴바 및 개별 메뉴 등이 설정되어 있다. [그림 4] 실제 사용한 footer의 모습. 페이지 기준으로 하단에 사이트 정보, 회사 전화번호, 로고 등이 포함 될 경우 header처럼 디자인 적용 후 단순히 호출하여 사용 가능하다.
[그림 5] 실제 네이버 footer의 모습. 만약 footer를 사용하지 않을 경우 페이지 하단의 메뉴, 정책, 디자인 등이 바뀔 경우 몇 백만의 페이지를 일일히 수정해야만 하지만 footer를 사용할 경우 파일 하나를 수정하여 모든 페이지에 적용/수정이 가능하다.
1. header 및 footer 생성
1-1. header 생성
목적은 모든 페이지에 적용될 상단 메뉴를 디자인 한 후 개별 페이지에서 호출하기 위함이다.
경로 : views/partials/header.ejs
[그림 6] header.ejs의 실제 디자인
<!DOCTYPE html>
<html>
  <head>
	<title>Yelpcamp</title> <!-- 브라우저 상단의 페이지 타이틀 이름-->
	<link rel="stylesheet" href="https://maxcdn.bootstrapcdn.com/bootstrap/3.3.5/css/bootstrap.min.css"> <!-- bootsrapt CDN -->
  </head>

  <body>
	<nav class="navbar navbar-default"> <!-- 페이지 상단에 메뉴바를 디자인을 위한 공간 할당(full witdth) -->
	  <div class=container-fluid"> <!-- navbar-default에서 좌우 각 15px 씩 padding을 준 container-->
		<div class="navbar-header">
		   <a class="navbar-brand" href="/">YelpCamp</a>
		</div>

		<div class="collapse navbar-collapse">
		   <ul class="nav navbar-nav navbar-right"> <!-- 페이지 우측 및 수평 배치를 위해 <ul><li>태그 사용-->
			<li><a href="/">Login</a></li>
			<li><a href="/">Sign Up</a></li>
			<li><a href="/">Logout</a></li>
		   </ul>
		</div>
	  </div>
	</nav>
1-2. footer 생성
: 현재 레슨에서는 따로 페이지 하단 메뉴 및 디자인이 없으므로 단순히 <body>태그 및 <html> 태그를 마무리하는 소스만 입력한다.
경로 : views/partials/header.ejs
	</body>

</html>
2. INDEX 생성
해당 프로젝트에서 index 페이지는 db에 저장되어 있는 각각의 name, image를 화면에 출력해주는 역할을 한다. 작성된 index.ejs는 express를 통해 request를 요청한 client로 response 되며, 서버로부터 response를 받은 브라우저를 이를 해석하여 user가 볼 수 있도록 페이지를 출력한다.
[그림 6] 해당 프로젝트의 index 페이지(좌). 각 캐릭터는 db에 저장된 name, imageUrl을 이용하여 화면에 출력한다(우)
2-1. index.ejs 생성
<!-- partials/header.ejs를 불러온다-->
<%- include("partials/header") %>

<div class="container"> <!-- 해당 container는 모든 contents를 페이지 중앙에 위치시키기 위해 사용-->
	<header class="jumbotron"> <!-- 기능적으로 div와 동일하게 컨텐츠를 분할함. 하지만  semantic web에서는 해당 class의 내용은 강조된 내용으로 인식-->
		<div class="container"> <!-- <header> 태그 내의 컨텐츠만 따로 디자인하기 위해 추가적인 div 사용
			<h1>Welcome To YelpCamp!</h1>
			<p> View our hand-picked campgrounds from all over the world</p>
			<p>
                <!-- 강조되며 큰 사이즈 버튼 생성, 클릭 시 "/campgrounds/new"로 링크됨-->
                <a class="btn btn-primary btn-lg" href="/campgrounds/new">Add New Campground</a>
			</p>
		</div>
	</header>


	<div class="row text-center" style="display:flex; flex-wrap: wrap;"> <!-- 개별 데이터를 보여주는 컬럼의 텍스트 위치, 반응형 여부 설정 -->
    	<% campgrounds.forEacher((campground) => { %> <!-- 스크립트에서 돌아가므로 선언문 사용. app.js에서 allCampgrounds가 할당된 campgrounds를 forEach문으로 돌려 모든 데이터를 출력 -->
        	<div class="col-lg-6 col-md-4 col-sm-3"> <!-- 페이지를 12등분 했을 때 각 1200px 이상= 6/12칸, 992px 이상 = 4/12칸, 768px 이상에 해당하는 grid 사이즈로 컬럼을 출력 -->
				<div class="thumbnail"> <!-- thumnail 사용-->
					<img src="<%=campground.image%>"> <!-- campground의 image value를 추출하여 이미지 출력-->
					<div class="caption"> <!-- <h4>에 출력된 이름을 사용-->
						<h4><%= campground.name %></h4>
					</div>
						<p>	<!-- campground에 추출한 id값을 이용하여 각 데이터의 상세페이지로 링크하는 버튼 추가-->x
							<a href="/campgrounds/<%= campground._id %>" class="btn btn-primary">More Info</a>
						</p>
				</div>
        	</div>
    	});%>
	</div>
</div>